If you want to build a website, one of the first things you need to learn is how to host a WordPress site. Hosting makes your website available online, while WordPress gives you the tools to design pages, publish blog posts, and manage your content with ease.
For beginners, the process can sound technical at first. You need a domain name, a hosting provider, a WordPress installation, and a few important settings to make sure your website is secure and ready for visitors. The good news is that once you understand the steps, hosting a WordPress website is much easier than it seems.
In this guide, you will learn how to host a WordPress site from start to finish. We will cover the essentials, explain the different hosting options, and walk through the full setup process in a simple, beginner-friendly way.
Table of Contents
What Does It Mean to Host a WordPress Site?
To understand how to host a WordPress site, you first need to know what hosting actually does.
A hosting provider stores your website files, images, database, themes, and plugins on a server. When someone types your domain name into a browser, that server delivers your website to the visitor.
In simple terms:
- Domain name is your website address
- Hosting is where your website lives
- WordPress is the software you use to build and manage the site
Without hosting, your WordPress website cannot go live on the internet.
What You Need Before You Host a WordPress Site
Before you start the setup process, make sure you have the following:
1. A Domain Name
A domain name is the address people type to visit your website, such as yourwebsite.com.
2. A Hosting Account
You need a hosting plan that supports WordPress. Most providers offer beginner-friendly hosting with one-click WordPress installation.
3. WordPress Software
Many hosts install WordPress automatically, so you do not always need to do it manually.
4. An SSL Certificate
An SSL certificate secures your website and changes your site address from HTTP to HTTPS. This improves trust and helps support SEO.
Types of Hosting for WordPress
If you want to know how to host a WordPress site the right way, you need to choose a hosting type that matches your goals.
Shared Hosting
Shared hosting is the most affordable option. Your website shares server resources with other websites.
Best for: beginners, bloggers, and small websites
Pros:
- Low cost
- Easy to manage
- Good starting point for new sites
Cons:
- Limited resources
- Lower performance during traffic spikes
VPS Hosting
VPS hosting gives your website a dedicated portion of a server.
Best for: growing websites and businesses
Pros:
- Better performance
- More control
- Easier to scale
Cons:
- Higher cost
- May require technical knowledge
Cloud Hosting
Cloud hosting uses a network of servers instead of a single machine.
Best for: websites expecting growth or variable traffic
Pros:
- Good flexibility
- Strong uptime
- Scalable resources
Cons:
- Pricing can be more complex
- Not always ideal for complete beginners
Managed WordPress Hosting
Managed WordPress hosting is built specifically for WordPress websites.
Best for: business websites, agencies, and users who want convenience
Pros:
- WordPress-optimized performance
- Better support
- Automatic updates and backups
Cons:
- More expensive than shared hosting
- Some limitations on plugins or settings
How to Choose the Right WordPress Hosting Provider
Choosing the right provider is an important part of learning how to host a WordPress site successfully.
Performance
Look for hosting that includes:
- SSD or NVMe storage
- strong uptime
- caching tools
- CDN support
- data centers near your target audience
Security
A quality host should offer:
- free SSL
- malware scanning
- firewall protection
- automatic backups
- secure login features
Ease of Use
Beginners should look for:
- one-click WordPress installation
- simple dashboard
- easy domain connection
- backup controls
Support
Customer support matters, especially if you are new to hosting. Look for:
- 24/7 support
- WordPress knowledge
- helpful setup documentation
Pricing
Do not only compare the starting price. Also check:
- renewal rates
- migration fees
- backup costs
- domain renewal pricing
- email hosting cost
How to Host a WordPress Site Step by Step
Now let’s go through the full process of how to host a WordPress site.
Step 1: Choose a Hosting Plan
The first step is choosing the right hosting package for your website.
If you are starting a personal blog, portfolio, or small business site, shared hosting is often enough. If you want more speed, better support, or improved security, managed WordPress hosting may be a better choice.
Try to choose a plan based on:
- your expected traffic
- your budget
- your technical skill level
- the features you need
Step 2: Register Your Domain Name
Next, register a domain name for your website.
A good domain name should be:
- short
- easy to remember
- easy to spell
- relevant to your brand
Many hosting providers let you register a domain during sign-up. If you already own a domain, you can connect it later.
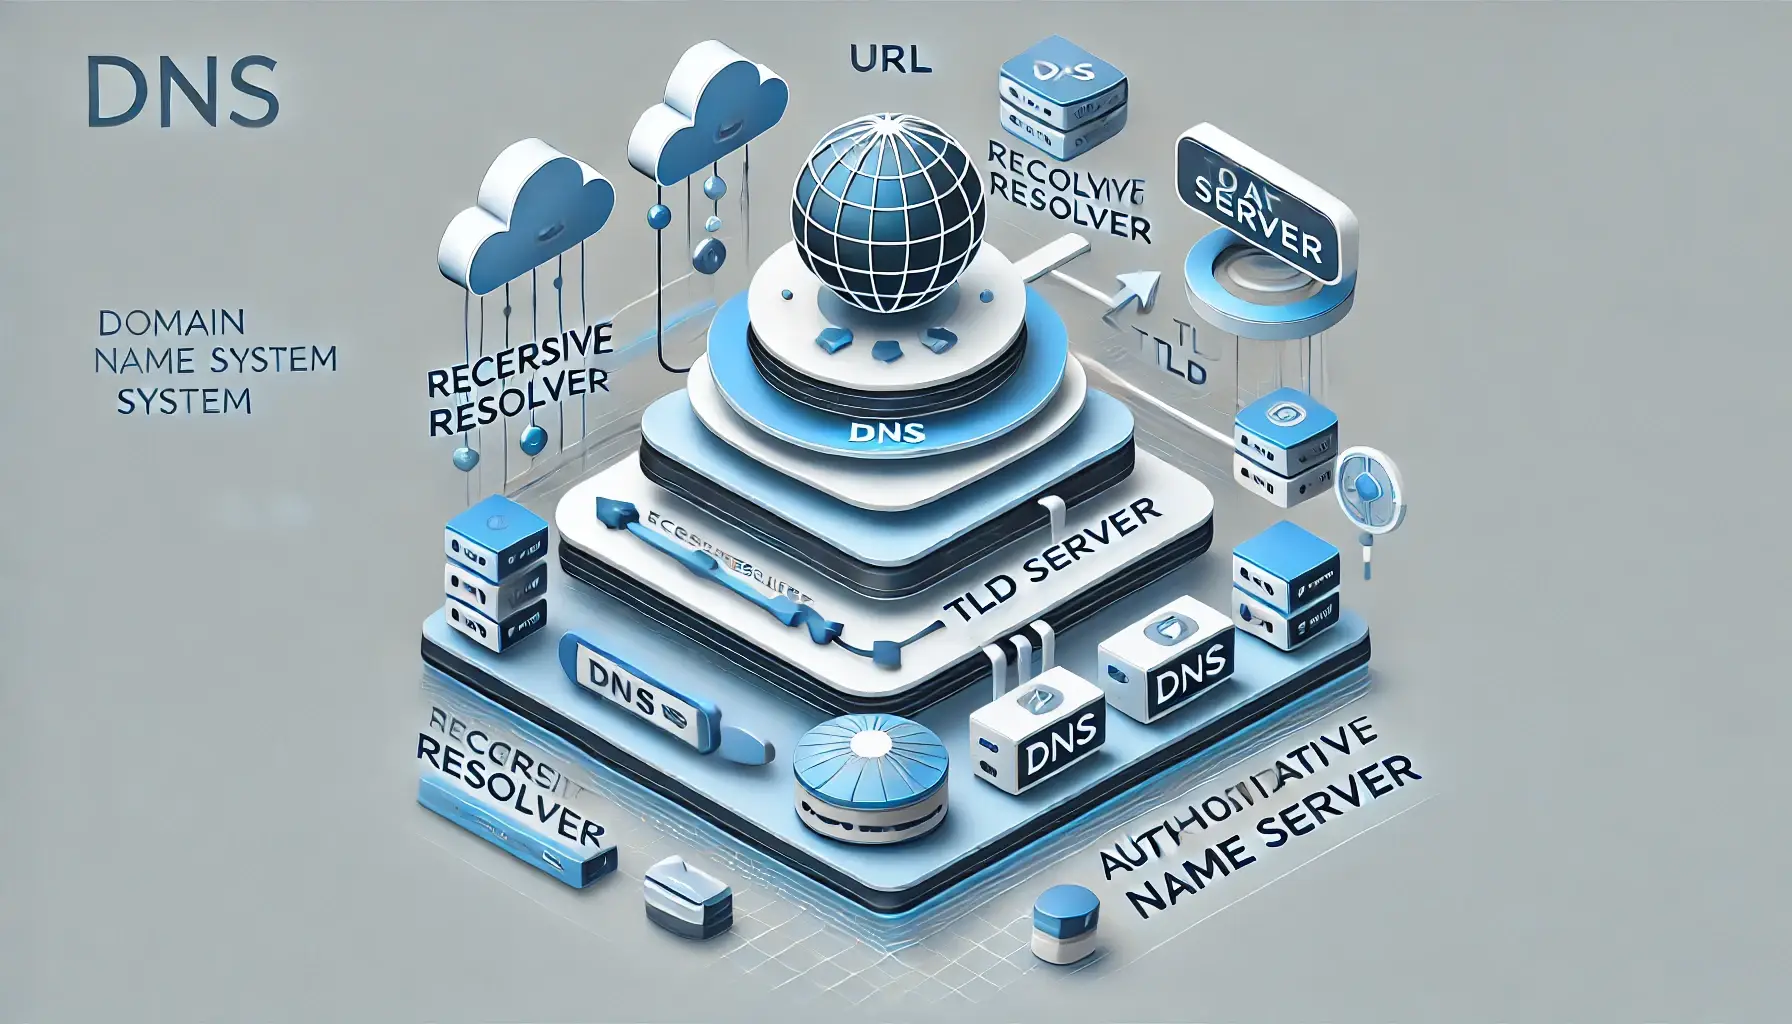
Step 3: Connect Your Domain to Your Hosting
If your domain and hosting are with the same provider, this may happen automatically.
If they are with different companies, you will need to connect your domain using DNS settings. This usually means updating:
- nameservers
- or A records
Your hosting company will provide the correct values.
DNS changes can take time to update globally, so do not worry if the website does not appear immediately.
Step 4: Install WordPress
Most hosting providers include a one-click WordPress installer. This is the easiest way to host a WordPress site as a beginner.
The usual steps are:
- Log in to your hosting dashboard
- Open the control panel
- Find the WordPress installer
- Choose your domain
- Enter your website details
- Create your admin login
- Complete the installation
After installation, you can usually log in through:
yourdomain.com/wp-admin
This is the main dashboard where you will manage your website.
Step 5: Log In to Your WordPress Dashboard
Once WordPress is installed, log in to the admin dashboard.
From there, you can:
- install a theme
- create pages
- publish posts
- add plugins
- change settings
The WordPress dashboard is the control center of your website.
Step 6: Choose and Install a Theme
A WordPress theme controls the design and layout of your website.
To install a theme:
- Go to Appearance
- Click Themes
- Select Add New
- Search for a theme
- Click Install
- Click Activate
Choose a theme that is:
- mobile-friendly
- fast-loading
- regularly updated
- easy to customize
A lightweight theme can help improve speed and user experience.
Step 7: Install Essential Plugins
Plugins extend the functionality of your WordPress website.
You may want plugins for:
- SEO
- backups
- security
- forms
- caching
- image optimization
Do not install too many plugins. Too many can slow down your site and create conflicts.
Step 8: Set Up SSL and HTTPS
A secure website is essential. Your site should use HTTPS instead of HTTP.
Most good hosting providers offer a free SSL certificate. Once enabled, your website will display the padlock icon in the browser.
This helps:
- protect visitor data
- build trust
- support SEO
Make sure your site URLs are updated correctly after enabling SSL.
Step 9: Configure Basic WordPress Settings
Before launching, review your main settings.
General Settings
Update:
- site title
- tagline
- admin email
- time zone
Permalinks
Choose a clean URL structure like this:
yourdomain.com/sample-post/
This looks better and is more search-friendly.
Reading Settings
Choose whether your homepage shows:
- your latest posts
- or a static homepage
Discussion Settings
Set your comment preferences and spam controls.
Step 10: Create the Main Website Pages
Most websites need a few core pages before launch.
Common pages include:
- Home
- About
- Contact
- Blog
- Privacy Policy
Business websites may also need:
- Services
- Pricing
- FAQ
- Testimonials
These pages help visitors understand who you are and what you offer.
Step 11: Optimize Website Performance
A major part of learning how to host a WordPress site properly is making sure it runs quickly.
Here are a few speed tips:
- use a lightweight theme
- compress large images
- activate caching
- remove unused plugins
- keep WordPress updated
- use a CDN if your host supports it
A faster website improves user experience and can support better search visibility.
Step 12: Set Up Backups and Security
Backups and security should never be ignored.
At minimum, your website should have:
- automatic backups
- strong passwords
- updated plugins and themes
- login protection
- malware scanning
Security issues can affect any website, so it is important to protect your WordPress installation from the beginning.
Step 13: Test Your Website Before Launch
Before your website goes live, test everything carefully.
Check:
- mobile responsiveness
- page speed
- menus
- contact forms
- images
- internal links
- spelling
- SSL functionality
Testing helps you catch mistakes before visitors see them.
Step 14: Launch Your WordPress Site
Once everything is ready, publish your website and make it live.
After launch, make sure you:
- submit your site to Google Search Console
- connect analytics
- publish useful content regularly
- monitor uptime and performance
At this point, you have successfully learned how to host a WordPress site and launch it online.
Common Problems When Hosting a WordPress Site
Even if the process is simple, beginners sometimes run into issues.
Domain Not Working
This is often caused by incorrect DNS settings or DNS propagation delay.
SSL Not Active
Make sure your SSL certificate is enabled and your site is loading with HTTPS.
Slow Website
This may happen because of poor hosting, large images, heavy themes, or too many plugins.
WordPress Installation Failed
Check your hosting requirements, database settings, and installer details.
Plugin Conflicts
If your website breaks after installing a plugin, disable the newest plugin and test again.
Best Practices for Hosting a WordPress Site
To keep your site fast and secure, follow these best practices:
- choose hosting that fits your traffic needs
- keep WordPress updated
- install only necessary plugins
- enable automatic backups
- use HTTPS from day one
- use strong login credentials
- monitor performance regularly
These habits will help you maintain a reliable site over time.
Final Thoughts
Learning how to host a WordPress site is one of the first important steps in building an online presence. Once you choose the right hosting, connect your domain, install WordPress, and configure the basics, your website is ready to grow.
For beginners, the easiest approach is to start with a hosting provider that offers one-click WordPress installation, free SSL, backups, and good support. From there, you can focus on creating content, improving speed, and building a website that serves your audience well.
If you follow the steps in this guide, you will have a strong foundation for launching and managing a successful WordPress website.
Frequently Asked Questions
Is WordPress hosting different from web hosting?
Yes. Web hosting is a general service, while WordPress hosting is optimized specifically for WordPress websites.
Can I host a WordPress site for free?
Yes, but free hosting usually comes with limitations such as ads, poor performance, and less control.
Do I need a domain name and hosting?
Yes. Your domain is your website address, and hosting is where your website files are stored.
Is shared hosting good for beginners?
Yes. Shared hosting is often the best low-cost starting point for new WordPress websites.
How long does it take to host a WordPress site?
You can often set up and launch a basic WordPress website in less than an hour.